Ill be on a small break this week so I can attend the USITT2010 confrence. I am getting great stuff for the blog and will post a wrap up next week. As I write this I just finished day one and it was great. See you next week.
Tracking Multiple Budgets in Excel
25 03 2010One of my favorite jobs in theatre is as a production manager. I enjoy scheduling, solving problems and yes tracking budgets. One way to track multiple budgets is to use and excel spread sheet. Here are some tips on how to make a budget sheet but also how to make that information available in an easy to read format.
First let’s start with tracking a single budget line and ask information do we want to track as we enter expenditures. I like to make a single budget line for each department and for each production or maintenance line.
Lighting Budget R&J
| Date | Purchase # | Purchased From | Item Purchased | Cost | Budget Spent | Budget left |
| Starting Budget | $300.00 | |||||
| 4-Mar | 1 | BMI Supply | Gel | $78.50 | $78.50 | $221.50 |
| 10-Apr | 2 | Limelight | gobos | $50.00 | $128.50 | $171.50 |
| 11-Apr | 3 | APG | instrument rental | $100.00 | $228.50 | $71.50 |
| 15-May | 4 | home depot | practices | $60.00 | $288.50 | $11.50 |
| $288.50 | $11.50 | |||||
| $288.50 | $11.50 | |||||
| $288.50 | $11.50 | |||||
| Totals | $288.50 | $11.50 |
To start set up the columns you want to track leaving the last two columns for what was spent and what was left. Excel makes the math easy and quick. To get Excel to do any math start the cell with =. So if in the example above it we want to add the cost of the item to what we have spent so far type in equals then click the cost cell then the cell above to get the new total spent. To figure the budget left column, take the cell above and subtract the cost of the item. This will give you a running total of this line. You don’t need to enter the formula for every cell. You can copy the first cell then highlight the rest in that column and paste. Excel will recognize the pattern and shift the cells appropriately. The other method create the formula is to highlight the cell or cells you want to copy then put your cursor on the bottom right corner and wait for it to turn into a +, then drag
| A | B | C | D | E | F | G | |
| 1 | Date | Purchase # | Purchased From | Item Purchased | Cost | Budget Spent | Budget left |
| 2 | Starting Budget | $300.00 | |||||
| 3 | =E3+F2 | =G2-E3 | |||||
| 4 | =E4+F3 | =G3-E4 | |||||
| 5 | |||||||
| 6 | |||||||
| 40 | Totals | ||||||
| 41 |
*Tip– Highlight ever other row it make it easier to read the rows.
Once you get the budget line for the first show or budget line you can then copy and paste it on the sheet for multiple budgets or you can crest a worksheet for each one. To see a different worksheet go to the bottom of the page in Excel and there will be one to three tabs labeled Sheet 1, Sheet 2 and Sheet3. If you click the taps you move to a new work sheet. You can right click the tab in order to rename it or create a new sheet.
 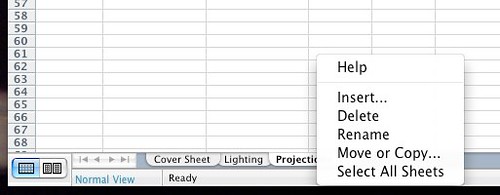 Once you create a new sheet just copy and paste the cells from the previous budget line.
Once you have each individual budget I like to make a cover sheet that gives me easy access to all the budget numbers.
| Budget Breakdown | |||
| Spent | Left | Budget | |
| Lighting and Sound | |||
| Odd Couple | $0.00 | $100.00 | $100.00 |
| Christmas Carol | $298.25 | $1.75 | $300.00 |
| Dance Ensemble | $0.00 | $250.00 | $250.00 |
| Rent | $2,333.51 | -$2,287.24 | $46.27 |
| Hamlet | $0.00 | $400.00 | $400.00 |
| Supplies/Rental Equipment | $1,202.83 | $2,447.17 | $3,650.00 |
| $3,834.59 | $911.68 | $4,746.27 | |
| Projections | $0.00 | $1,000.00 | $1,000.00 |
*tip-Highlight all the cells that deal with money and right click and choose format. Change the format to currency.
In order to get the numbers from the previous sheets, select the cell where you want the information, put in the = then click the tab of the sheet where the info is stored. Once on that sheet double click the cell you want to reference and you will return to the cover sheet. Once you do this anytime you add a new purchase it will be updated on the cover page. Once you have all the individual numbers you will need to total them in order to get a sense of the overall budget. To total a column or row you need to enter the formula =sum(first cell:last cell) or you can hit the S symbol on the toolbar and it will add this formula for you.
| A | B | C | D | |
| Spent | Left | Budget | ||
| 4 | Lighting and Sound | |||
| 5 | Odd Couple | =Lighting!E34 | =Lighting!F34 | =C5+B5 |
| 6 | Christmas Carol | =Lighting!L34 | =Lighting!M34 | =C6+B6 |
| 7 | Dance Ensemble | =Lighting!S34 | =Lighting!T34 | =C7+B7 |
| 8 | Rent | =Lighting!Z34 | =Lighting!AA34 | =C8+B8 |
| 9 | Hamlet | =Lighting!AG34 | =Lighting!AH34 | =C9+B9 |
| 10 | Supplies/Rental Equipment | =Lighting!AN34 | =Lighting!AO34 | =C10+B10 |
| =SUM(B5:B10) | =SUM(C5:C1) | =SUM(D5:D10) |
Once you get the file set up its always good to go back and make it look pretty, bold the sections you need to and then pint a report to see what it looks like. Another way to get new ideas is to ask how others use excel and copy and paste the code they use. Here is a sheet I use with fake numbers for the year.
Comments : 1 Comment »
Categories : Uncategorized
Virtual Light Lab Gets an Update and Video
23 03 2010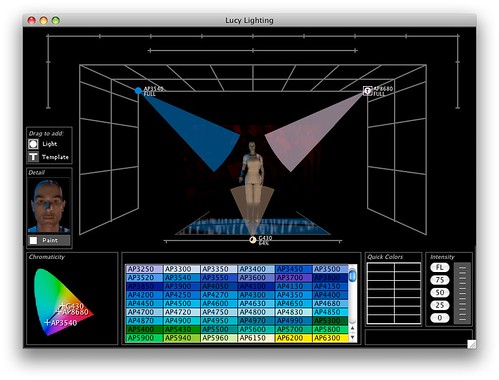 Virtual Light Lab has been in my lighting tool box for over 15 years. I only know its been this long because I started using it before I was married. Virtual Light Lab is a tool used in the early stages of design to work out basic color, angle and intensities for your lighting design and can be used to story board your design to communicate your thoughts to a director or other members of the production team. Without taking time to hang a lot of lights, you can quickly hang a light then move it to over 50 positions in order to get the angle you want. At the same time you can choose from over 1000 different color filters or us a color mixing system to choose the perfect color. Before I used light lab I tended to stick with colors I knew or at least one companies colors. Since light lab I now regularly use three or for filter manufacturers. Once you create a look you can put your model into a stage scene and record that look to play back in a slide show. Each look you save you can have the looks fade in time and create a storyboard for the show. Another feature I like when teaching lighting is the draw beam function. It shows the beams and gives some basic information about the beam angles. Below are the list of features for the Westside Systems Website:
- Over 70 lighting positions including footlights
- 1,100 standard filter colors
- CMY and RGB color mixing
- CIE chromaticity map
- Breakup gobo
- Display beam angle and direction
- Face lighting detail view
- Place multiple models on the stage, each lighted differently
- Select from over two dozen model poses and orientations
- Five backdrops, plus import any image as a custom backdrop
- Four-circuit color mixing on backdrops, top and bottom
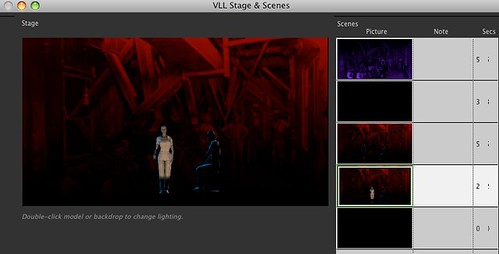
- Record scenes, then play them back with timed fades
- Create QuickTime movies
- Print or export stage images
- Easy to learn and use
- Fast image rendering

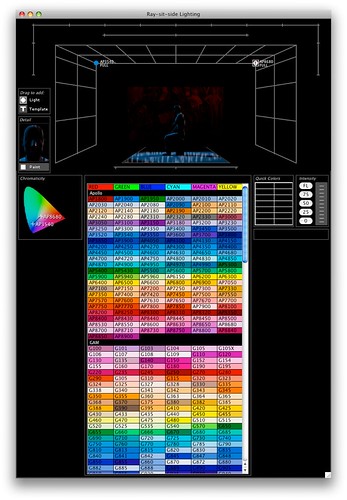
Some of the new features in this update include better backdrop management, color names were added to the program, insert blackouts and in a lighting look you can see the CIE chromaticity of your color palate. The drawbacks are the program could use one or two gobo choices and it needs ability to paint the model and keep the skin tones a different color from the model. On of the best new features was you can now record a video of your slide show with several different video output options. Here is on I created in just minutes of downloading the upgrade.
 This application is a must have for a designers toolbox. The prices are reasonable $149 and $239 for an individual license. The upgrade is$ 20 for the individual and $50 for a site license. It saves me time in my early design phase by giving me lighting angles at my finger tips and saves me time looking through thousands of gel swatches. It also is a great way to show off your preliminary work to your fellow designers and directors. Its easy to use and a great teaching tool. Each year I do a lighting workshop for high school students and with in five minutes of turning on the program they are creating lighting looks. I have argued with some over the years who say Virtual Light Lab is not 100% accurate. I say find me a visualization program that is that accurate. It is hard to represent on a 2d screen what light that is emitted from a source, bounces off an object, absorbs some light and then is reflected into the eye. If you want a program that will show off how the lights will work in the space another program like WYSIWYG or Vectorworks, but the set up time in those programs is 10-20 time longer. Virtual Light Lab is fast, easy to learn, and can help you narrow your choices in order to start to do some real world tests.I highly recommend this product and suggest downloading the demo today.
Comments : Leave a Comment »
Categories : Review
Can a Portfolio Fit in Your Pocket? Review-Portfolio
19 03 2010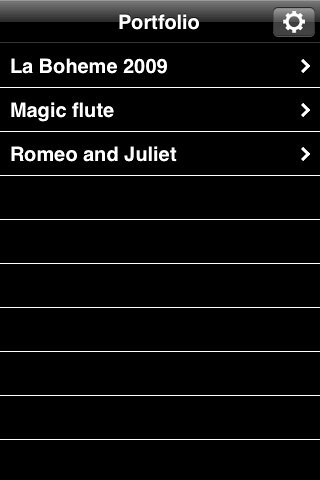 I had been wanting to get the Portfolio app on the iPhone by Michael Zinman for some time. Michael makes a number of apps geared for the theatre professional and I wanted explore the concept of having a digital portfolio on the same device you make call.
Review
Portfolio costs $4.99 and is available on the iPhone/iPod touch. The app is designed to turn that device into a small version of your portfolio. It takes the photo albums you have stored on a Google Picasa Web albums account and loads them on the iphone. You can then delete the albums you don’t want and turn on or off captions. Then its ready to show and the user chooses an album and the program tiles the photos to create an attractive front page to the album. The user can click on a picture to enlarge then scroll through the album or start a slide show. The interface is easy to use and creates an attractive slide show. There are several problems with Portfolio, it assumes you have a Google account and everything you need to upload to that account. Its not hard to do and is free to make it useful you need to take the time to learn the Picasa application or on the Mac get a plug-in for iPhoto to easily upload the photos. Now  if you read the reviews in the iTunes store several people complain about the app crashing and not working. This happened to me several times after I bought the application. I was at work on a wireless network that is a broadband connection but not the fastest. I was trying to sync with my personal Picasa account that had several albums and hundreds of pictures stored on it. After an hour I gave up and wrote Michael for some support. Once I got home I thought I would give it another try and it worked on my slightly faster connection at home. It took a long time an at one point I just shut off the sync because I didn’t need a hundred photos of my kids in my portfolio. Michael did respond later that evening and suggested not letting the device go to sleep while it syncs. If you have a large album you could be a while constantly touching the device so it does not go to sleep. He also asked for my Google user name and password to see if he could help by trying my album on his device. I did not and will not send that information to anyone, that account is tied to all my other Google services, which I use several. To make it work better for me I used a secondary Google account that I had not loaded any pictures and after a half an hour I had three shows loaded and did a quick sync that was fast and worked well. The $4.99 is too much for this application, after a quick search I found several applications that sync with Picasa web albums many of them $.99 and seem to have similar or the same functionality like Web Albums Picasa or iPicasa. If you want a completely free way to get the same functions sign up for Photobucket and download the Photobucket app. Its stores the photos on the device and has a slide show. At this point the price is too high for what this app does and there are too many cheaper alternatives for me to recommend getting the Portfolio app.
Mobile Digital Portfolio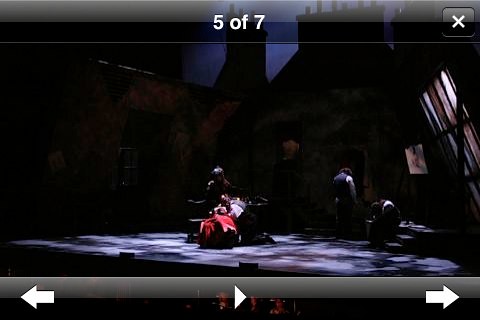
What I discovered in all of this is the iPhone and most mobile devices are just too small to show off most peoples work. To make it work you would need to really zoom in and crop the photos to get them to work on a smaller platform. For a regular portfolio I recommend to my students to rarely use photos smaller that 5×7. For lighting designers especially, it hard to show detail even on closeups in smaller photos. The iPhone screen is just too small to show off that detail. I also discovered you can get your own personal portfolio app made by Folio for $699. Now if there were a larger device that had the functionality and interface as the Portfolio app I may be able to recommend that after it is released.
Comments : Leave a Comment »
Categories : Review
Light Plot Tipping
17 03 2010I grew up on a farm and never tipped a single cow, it didn’t seem fun or sporting. What I do enjoy is giving tips on how to make your light plot look good or ways you can be more productive when drafting in Vectorworks. These tips are based on fifteen years of drafting light plots on the computer using several different programs including WYSIWYG and Mac Lux Pro and are not limited to using them in Vectorworks.
1. Line weight line weight line weight! The best way to make your plot look good and be read more easily is to vary your line weights. The important parts of the plot like the lights and lighting positions should have a larger line weight than the set. A great way to manage line weights is by creating classes with there own distinct line properties.

Same Line Weight
Varied Line Weight
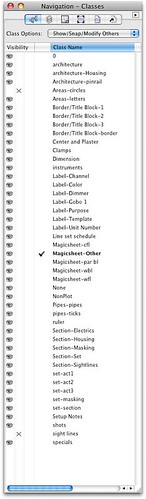
2. Use Classes. I use classes to manage my line weights but also to organize my plot for several different uses. I create a file that contains not only the plot but section and magic sheet. I have found its easier to have all the data in one location. I don’t have to take lots of time jumping from one file to the next. By turning on and off classes I can get to the information quickly. In the case of the magic sheet I can reuse the set and space drafting I did for the plot and when the set gets an update I make one change that updates my plot and magic sheet.
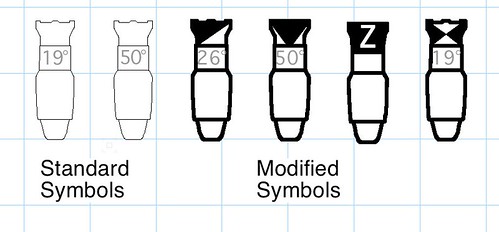
3. Don’t use the standard Vectorworks lighting symbols. First the basic symbols in Vectorworks have a very thin line and they tend to get lost in a light plot. I recommend .5mm line weight but have used anywhere form .3mn-.7mm for my lighting symbols. The other change I make to the symbols has to do with the instrument field angle degree. I work in a lot of houses with the ETC Source 4 instrument and Vectorworks uses small gray letters to show the difference between a 36degree and 50degree. Once you get a couple feet away from the plot its hard to tell the difference in symbols. I do two things to the symbol, I add a mark in the barrel of the symbol and use the USITT recommended practices to denote the field angle. I then that mark and shade it or fill it in, which makes it really easy to see the difference from further away from the plot. I saw this first on a hand drafted plot by Donald Thomas and adapted it to cad.
4. Use color as you would line weight. I have rigorously debated this topic for several years now and know I am still in the minority. Now that color printing has come down in price it is not unusual to have access to a large format color printer. Color can be used to help emphasize or recede an object in the drawing just as line weight does. Use it just as you would and in conjunction with line weight, a brighter color is used to highlight something important and lighter colors can be used on things like the set to pull it into the background. It works best for a multi-set show where just using black or gray would only confuse the issue. Color should be used conservatively, avoid colors like yellow that don’t print well or pink that just looks unprofessional. Red should only used when something is really important, it tends to draw the eye to it first. I use as very tight color palette because I don’t want it to end up looking like a rainbow. (I did that once on a Christmas Carol Plot)

")
Christmas Carol Plot 2006 too many colors
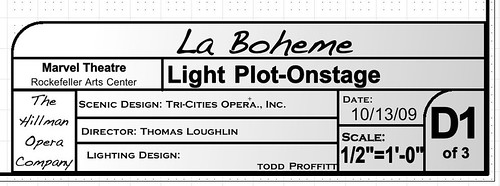
 5. Design your title block. Don’t be satisfied with the standard block title block or the one provided by your lighting program. The title block can really make the plot look good, take a look at architectural drawings, architects take great pride in designing a unique title block that can easy be recognized. This can be achieved simply by adding a graphic or having and irregular side. I tent to take that style and add it to my legend for consistency.
6. Create a base file or resource file. If you work in a space more than once don’t re invent the wheel. After that first plot delete your instruments and save it as a base file with all your edited symbols, classes and new title blocks. If you work in multiple spaces create a file with all your favorite symbols, title blocks and legends then add that file to your resource browser so you can easily retrieve them. Another trick is to save your base file as a template in the Standards folder which is in the Default folder that is in the Libraries folder in Vectorworks. That file will show up as a standards option next time you go to create a new class and will bring that information into your new file.
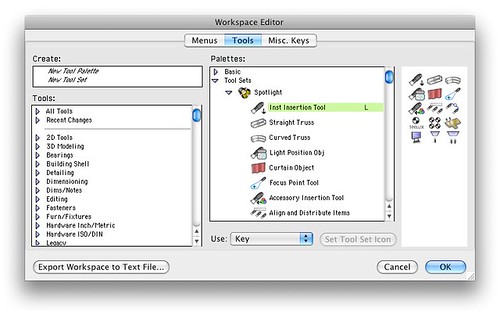
7. Edit your workspace. Keyboard shortcuts save you time and make you money, learn them. There are tons of them that make your life much easier when drafting but when you move into the spotlight workspace many of the common light plot functions like, insert an instrument and label legend manager don’t have a shortcut. To solve this I just use a copy of the the spotlight workspace and create shortcuts for those things I use the most.
8. Vectorworks and Lightwright. When you can upgrade to at least Vectorworks 2009 and Lightwright 5. Starting with these versions you can now automatically transfer data back and forth between the programs. I have used this on several shows and found it had not only increased the speed in which I get out the paperwork but the accuracy of both documents.
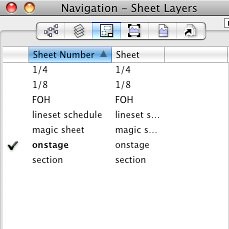
9. Viewports and Sheet Layers. Viewports were first introduced somewhere version 11 of the Vectorworks software. I can say I really did not adopt them until the 2009 version. They are simply a way to define a “view” on the design layer and put it into its own sheet layer for printing. What they have allowed me to do is keep all the information for design on one file and then just do a viewport of the sections I need to print. I will create one or two for the plot depending on the size of the house, one for the section and one for the magic sheet. Once I created on for the line set schedule to give to the the ATD who needed one. I can make a magic sheet much faster with the plot as a base just by turning off several classes and creating a new view port in a new scale. On the last show I did, viewports fixed a long standing problem I had in Vectorworks. I would change the scale of the layer to print a 1/4″ or 1/8″ plot but when I did the line weights would print too heavy. When you create a viewport you can reduce the scale and line weight at the same time and I was able to print smaller plots that looked good.

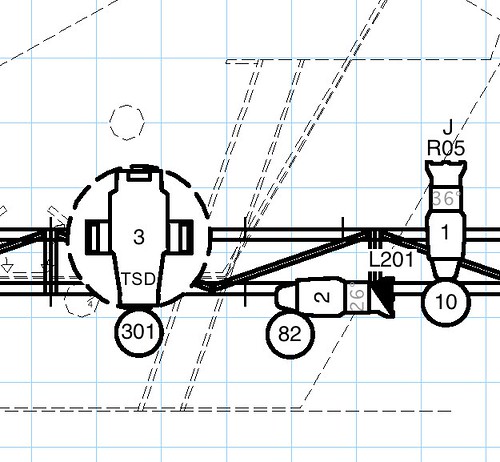
Magic Sheet, Sheet layer (click to enlarge)

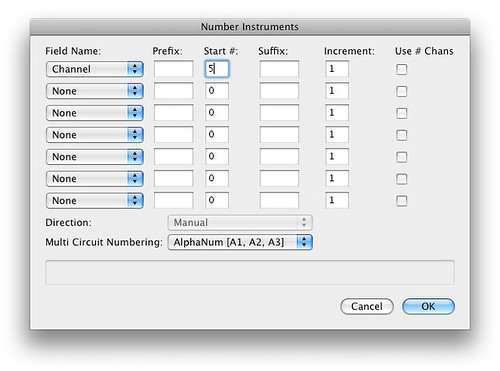
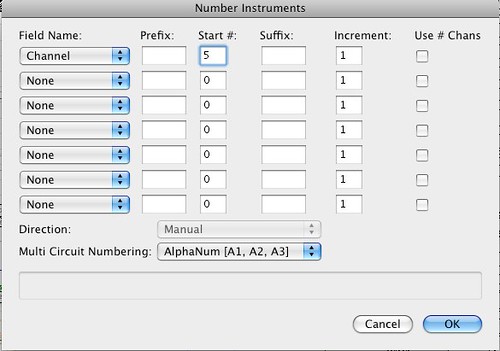
10 Numbering Tool/Find and Replace. The numbering tool was new to 2009 and allows you to quickly number, instruments channels or other data in a sequential order any by clicking on the instruments. I found this to be a great time saver in imputing the data and to change the data quickly the Find and Replace is a powerful tool to make those changes. If you need to switch out the front light color to R86 find and replace can do it in a few clicks.
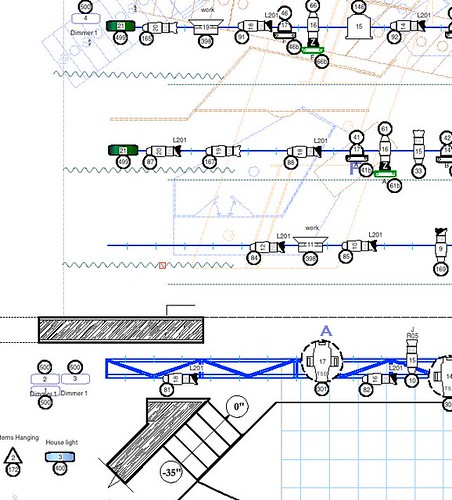
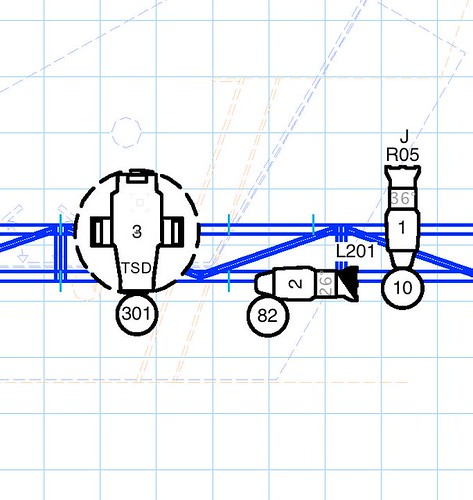
Ok I could easily do ten more but this is a good place to start. The examples I used were from my plot for La Boheme feel free to download the VW2010 version of the plot or a pdf of the onstage plot or section. Some of these tips can make you faster at what you do which will give you more time for fun or even take on another job. The rest will help you make that plot look unique and show off your style. Please leave a comment on your favorite tip.
ps. If you are using VW2010 update to service pack 2. I opened my plot to start to do screen shots and made one minor change and half my symbols disappeared.
Comments : 8 Comments »
Categories : Drafting, Tip
Dear Mobile Developer
15 03 2010A few weeks ago I posted a poll on the site What do you want out of a mobile lighting app? There were not very any responses but I think the results have some merit.
| Function | #Votes | % | |
| Edit Paperwork | 8 | 9% | |
| Read Paperwork | 8 | 9% | |
| Power calculation | 6 | 7% | |
| DMX address calculations | 5 | 6% | |
| Gel catalog | 5 | 6% | |
| Remote console control | 5 | 6% | |
| Cable check (electrical, xlr, dmx) | 5 | 6% | |
| Beam size calculations | 5 | 6% | |
| Gobo catalog | 5 | 6% | |
| Lighting control | 5 | 6% | |
| Foot Candle calculation | 5 | 6% | |
| Time cues | 4 | 5% | |
| Equipment manuals or information | 4 | 5% | |
| Flashlight | 3 | 3% | |
| Gel cut calculations | 3 | 3% | |
| Other (see below) | 3 | 3% | |
| Analyze color | 3 | 3% | |
| Lighting Blog | 2 | 2% | |
| Find a rental house | 1 | 1% | |
| Pre-visualization | 1 | 1% | |
| Draft | 1 | 1% | |
| Other | |||
| I just want something to tell me what cue I am in and what cue I am lined up for | |||
| not just a flashlight, but one that has a different display setting! | |||
| Lightwrigh | |||
I’ve had my iPod touch for about a year and a half. When I first got it there were only a couple of theatrical applications available for the platform at the time. My count is now over 50 applications for the iPhone (scroll down this page for my list) with a wide range of functionality. The apps and my tastes have become more sophisticated as new and better apps are released.
Poll Results
The top two choices are clear, people want to see a way to read and edit paperwork. Reading paperwork can be done now through a couple free non lighting apps. If you can convert your paperwork or plot into a pdf you can then sign up for Dropbox (itunes link) (my post on) or Evernote (itunes link) (my post on)and easily get them to not only the iPhone/iPod Touch but many other platforms like Android. Editing paperwork is still something that needs to be addressed. You could do it in a spreadsheet, there are several mobile spreadsheet programs available but the only way it is going to be useful is if it links with a paperwork program on the desktop. Editing on a mobile device would be a useful time saver but it would take to long to have to create paperwork on such a small platform. If its going to sync with the desktop a mobile or cloud solution is preferred over a wired sync. Will Lightwright ever come to a mobile platform? Well that’s up to John McKernon and we can always hope. The ability to intact with the plot would be a great feature but again the mobile platform is too small to create a plot. I would like the ability to not only read but take measurements from a plot in on a mobile device.
There are may tools that got 4to 6 votes each, most of these are already available and many of the new apps coming out are doing things like, power, dmx, color and beam calculations. For an app to stand out in these areas it needs to offer me more than I already have. Now that development for the mobile lighting platform is starting to mature, I think the multi-function apps will rise to the top if the have an affordable price. I tend to go to the app that will give me the most information the fastest. For exapmle, I tend to go to Wybron’s Moire Gobo app before Rosco’s iGobo app because I get a larger selection in Morie and can see what it looks like softened.
The items at the bottom of the list like gel calculations and draft are there because they can be done better on another platform. For gel calculation I think most of us do it in our head, its not that hard. Drafting is hard enough on a 15″ screen, and would be challenging on a 3″ screen. The only one I disagree with is the lighting blog, I have such an app and find it easier to read news from this blog on the app that reading it on any browser. There are hundreds of flashlight apps available and I think most people just turn on there phone, or iPod and use it as flashlight.
Dear Developer
So developers here are some things to keep in mind when you make a lighting app for the mobile market. And for the consumer here are some questions to ask before you buy.
1. Always ask is this app the most useful in a mobile situation, just because you can do it on the mobile app does not mean you should.
2. Does it lighten the users load? If they don’t always have to carry a flashlight or leave that laptop at the tech table.
3. Is the price worth how much I use it? Many lighting professionals and lighting students are on a budget and a $30 dollar app will have have a function that saves time or make me more productive. Always ask could I make more money if I drop the price can I make more on volume. If you have a chance read Free the Future of a Radical Price by Chris Anderson, you may be able to make more by offering a free solution.
4. How easy is the app to use? An app that I don’t need a manual and don’t have to search through pages for functions.
5. Beta test- Get it in the hands of users who are not your friends and get some good feedback. Recently I bought and app and I don’t think anyone outside the developer had ever used it before it was put in the store. If you need a list of testers contact me, I know advanced and beginning users that can help get you a variety of feedback.
6. Listen to the reviews and update. Even with testing you can’t find all the bugs or a user may suggest a feature you did not think about.
7. Develop for as many platforms as you can. The Google Andriod Phones are selling more and more each year and since there are fewer developers for this platform there are greater sales opportunities.
8. Know your competition, I’m not saying copy them or steal ideas but it will help you make informed decisions on things like price an features. If you make a beam calculator and your app shows beam size and foot candles with a limited inventory and your competitor does that with a larger library and allow you to look at three lights at a time you may not want to charge three dollar more.
As more people buy mobile devices the market is only going to grow. For the end user development in these mobile apps will only help out productivity and make our work easier.
Comments : Leave a Comment »
Categories : Editorial, Mobile Apps
Google Wave-Show Tested, Designer Approved.
12 03 2010
Electra-Department of Theatre and Dance SUNY-Fredonia. Scenic and Lighting Design by Colin Chauche Costume Design by Ashley Arnone
This month in Stage Directions Magazine Justin Lang author of the popular lighting blog isquint.net wrote an article on the new service Google Wave and how it can be used for collaboration for Theatre. He used as an example the work of Colin Chauche and the lighting crew on SUNY-Fredonia’s production of Electra. The article can be found here and if you don’t know about wave start with his article. When the article was written the production was sill in progress almost ready to open. After the production I sat down with Colin and we discussed the pro’s and con’s of using Google and here are our thoughts.
How Wave Was Used
Pre Production
Colin and his design assistant Gerald used the Wave to create the plot and subsequent revisions. Gerald created the plot then uploaded it to the wave. Colin would add comments and Gerald would make updates and Colin’s design mentors would also make comments. Once the final plot was done it was uploaded was well as the Lightwright paperwork files. It was quickly found it was a good idea to post a pdf of the final plot and pdf of the paperwork for those who did not have those Vectorworks or Lightwright. The Master Electricians took the files to prepare for the load-in.
Production
Once the hang started the Master Electricians were required to report their progress each night. This allowed Colin, the mentors and the buildings Operation Manager to leave comments and answer questions posed in the report. It took a while to get the format for the report. First it was a new report each night which cluttered the wave and then it was one report that was edited each night striking through what had been done and adding new items to the list. This practiced was continued through the close of the show.
Post Production
After the production everyone was invited to comment on the process of using Google Wave in the wave but no one responded. Most people did not check it after the show closed.
Pros
Having all the comments and files in one place is a big advantage. Often in emails its hard to follow a conversation when you have multiple people responding. Wave puts the conversation in one place and makes it easy to follow.
Being able to upload multiple files was useful. Colin and his design assistant were able to work on early versions of the plot. This was really handy over break, Colin was traveling out of the country and work on the plot did not stop.
The basic program was easy to use and learn. Adding files and responding to a wave was easy to figure out and no one on the team seemed to have a problem learning it.
Each reply has the picture of who posted it. If you have uploaded a picture to your Google account it shows up in the wave next to your reply.
Cons
Remembering to check the wave was the biggest problem. At the time you had to check the site to see if the Wave had been updated. The good news is email notifications have now been turned on in wave. To learn how, check out the Google Wave blog.
Wave needs a better way to do a to-do list. Once the production started and the wave got long it was hard to check off things and add new with out a manual reorder. An extension that let you check things off and move them to a done list is needed. I did find a wave extension for a to-do list but that leads to the next con.
The basic service is easy, some of the more advanced features that make wave very useful are hard to find and figure out. You can add a gadget or extensions to Wave that allow you to have a conference call add a map or poll. If it’s a featured extension it easy to find. There are hundreds of third party extension but finding them and installing them are not easy. Once you put a gadget in a wave you have to store the link or code somewhere so you can use it again. I created a wave that just has the extensions I have used. For help with wave and extension I recommend The Complete Guide to Google Wave by Gina Trapani with Adam Pash. It cost $6 but can be accessed free online.
Colin suggested, ability to tag or star a reply would be helpful. As the wave got longer it was harder to find things in the long lists. A tag would make it easier to find the important things.
There is no way to track changes in a single reply. It would be nice to have a document that could be edited by everyone in the wave and those changes could be tracked and approved by an administrator of the wave. If you posted a props list in a wave and need to change the changes would be highlighted telling you who made the changes.
There needs to be more integration with other Google products. The ability to add a Google Doc or picture from Picassa Web Albums would only add the the experience. For productions Google Calendar would could be used to post the schedule. That being said, a document, calendar or picture can be attached to a reply in wave.
Any member of the wave can add a member for a production that deals with sensitive materials an administrator should have control of who reads the wave.
Next Production
Looking forward I intend to build a base wave that has building policies and inventories uploaded so that all I need to do is to add new recipients.
A calendar with deadlines should be the first thing uploaded.
Conclusion
I have listed more cons than pros but this is still a service I recommend to use for collaboration. The ability to have a conversation with multiple people over a long period of time is something that I have not found in any other service. Over all it worked well for the production and the electrics department will continue to use it in the future.
Comments : 2 Comments »
Categories : Collaboration, Review
Make a Custom Gobo for VectorWorks
10 03 2010Spring is almost here so it must be time for the Third Annual Design a Gobo Contest by Apollo. This year I am entering three gobos and in there preparation I really needed to test them before I submitted them. This past fall our department did a production of Charlotte’s Web and the lighting designer needed a solution for clouds with very little throw distance. In the past I had put a boom right next to the cyc and had some success getting them to look good. This time I was not so lucky and went to find a skewed cloud gobo for just such a throw. Fast forward to last week when I saw Apollo’s recent contest announcement and quickly started designing. But if I was going to do this I needed to do some virtual tests to make sure my designs worked.
To create the gobos I used Photoshop, the contest called for a 2.6″ image and I used a 600 dpi resolution. I created what I wanted the clouds to look like then used the transform tool to skew the image on the template I had created. I then saved the files as a jpg.

Large Skewed Clouds From a Boom

Skewed Clouds from a Boom
In order to do the test I needed to use the gobo function that comes in spotlight. Here are the steps to create a custom gobo from my photoshoped images.
1. Create a surface to project the gobo on, in this case I created a 32′ line then extruded it to 18′ high.
2. Place a focus point in the middle of the cyc, make sure you change the standard 5′ high to the middle of the cyc @9′.
3. Insert the appropriate instrument for the throw you have chosen. For this test I used a 36 degree 6′ high three feet from the cyc. Make sure you put the name of your focus area in the instrument information. This will focus the beam of light.

4. To create a custom texture, go the the resource browser and right click. You will get a drop-down menu and first select new resource on (your file name) then select renderworks texture.

Right Click in the resource browser
5. Now you are in the texture screen fill in the name of your gobo and change the sizes to 2″ and the in obj size to 4″

6. In the transparency drop down menu select image projector then find the file you saved in Photo shop. If its a color gobo you may want to also go to the color drop-down and select filtered image. Chose the use transparency resource. This will use the same file you chose earlier. Then click ok on the dialoug box.

7. The easiest way to insert the gobo is to double click the lighting instrument then click on the light information tab. At the bottom you can select what gobo you want to use. Before you leave this dialog box make sure you select focus the light, by selecting the drop-down for the focus point you created.

8. The final step is to go to a view that best shows off your work like an isometric view. Then change your view to a final renderworks option. Make sure you don’t have the black background selected for some reason it does not work with this option on.

You will need to change your point of view to a 3d view or simply hit the #1 key on the keypad and you will now see your gobos. In this case I put both skewed gobos from the side and a Rachel’s sunset projected from the front. 
The second part of this story is the Rachel’s Sunset Gobo, as the name may imply it was designed by my 9 year old daughter Rachel. She designed the pattern on my iPod touch on the way to school one morning and I liked it so much I decided to enter it into the gobo contest. She used SketckBook MobileX, the free version of a paid painting program by Autodesk. She put the finishing touches on by importing her texture into Light by Digital Film Tools, which uses pre selected textures to enhance photos. I then took the rectangular image and transformed it into a square then cropped it into a circle.

Rachel's Sunset Gobo
So that was a couple ways to create your own gobo and test it out in VectorWorks. All three gobos were uploaed to the Third Annual Design a Gobo Contest this morning. Voting will begin May 5th and go until June 2 so make sure you take the time to check out all the contest entries and vote.
Comments : 1 Comment »
Categories : Tip, visualation
The App That Saves My Ears.
8 03 2010 This weekend I had the opportunity to watch my daughter in what can be described as a recital for her ice skating class. There are several solos mixed in between class demonstrations. As the first song played you could tell something was wrong. You could see across the rink the head of the program putting the intercom up to a CD player and holding the button down. As the first song played it got louder and louder as the mic got closer to the speaker. By the third song most of the audience was holding there ears. I knew the music was loud but was curious how loud, so that is were SPL Meter by Studio Six Digital came into play. I did a quick reading to find the sound was anywhere from 88 to 95dB.
 SPL Meter is a simple sound pressure level meter at works on the iPhone and iPod touch that only costs 99 cents. It has a simple retro interface that lets you choose a range, response, and weighting to get the best measurement. If you press the info button you can get a digital readout and a great dB chart to compare your level to some standard sounds. This summer when I bought the app to check monitor levels backstage. I used my professional dB meter to check its accuracy and it was perfect. One thing it doesn’t do is keep a record of the highest readings but if you need that feature its available in many more expensive spl apps.
  If you want to use it on the ipod touch you need to get a mic. I use one by Phillips that I got at Target for under $10. Just do a Google search for iPhone mic to find several more choices to add a mic to a 2nd or 3rd generation iPod touch. There are a couple free SPL meters out there like Sound Level Free which only give you an needle reading of the sound. If you have the iPhone or iPod touch get an spl meter if you work onstage or backstage and because of its features and price I recommend SPL Meter.
 Now when ever I use my sound meter I usually tend to check out a couple more apps since I have the mic out. Sound Hound by Melodis Corporation ($4.99) and Shazam by Shazam Entertainment Ltd. (free) Both apps allow you to take a sample of a song and will tell you the title and artist. Both do a pretty good job finding the song, even some more obscure songs. Each app allows you to find a Youtube version of the song and has a buy button for a quick iTunes Purchase. Sound Hound even lets you sing a portion of the song which comes in handy at parties, but it doesn’t work well with my off key/pitch singing. Yes you could find a way to use these apps for productions but lets face it they are just fun so enjoy.
Comments : Leave a Comment »
Categories : Mobile Apps, Tip
Theatrical Designers and the Digital Entertainment Space
5 03 2010Hi there! My name is Josh Jeffery and I’m a graduate of SUNY Fredonia’s Department of Theatre and Dance (B.F.A. Scenic Design, ’07). Like Todd (and maybe a bit because of being his student), I’m immensely interested in technology and digital media. After Fredonia, I took a less conventional route with my design degree and decided to enter the Entertainment Technology field. Entertainment Technology is loosely defined as entertainment experiences that are constructed upon or enhanced by technology, such as video games, interactive museum exhibits and theme park attractions. A now-established component of the entertainment field, it is beginning to gain significant recognition as a valid field of study, the first program of which (and where I gained my master’s degree) at Carnegie Mellon University’s Entertainment Technology Center.
The master’s program at Carnegie Mellon is truly unique; combining fine artists and technologists (like engineers, computer scientists and the like) and putting them in the most stressful of circumstances to rapid-prototype entertainment experiences for real clients. While there, I created virtual worlds where guests can conduct a 3-D fireworks show with their hands in real-time, an interactive exhibit for the Carnegie Science Center hosted by an animatronic R2-D2 and holographic C-3PO (voiced by Anthony Daniels himself!) and created my own project bringing unique cell-phone driven interactions to guests waiting in line at theme parks.
Interestingly, I never had to learn programming and I didn’t give up my skills as a designer to make this stuff. In fact, it’s my training as a scenic designer at Fredonia which enables me to help create all this cool, crazy stuff.
How do interactive museum exhibits, theme park rides or video games relate to theatrical design? It’s simple: entertainment experiences tell stories, and that’s exactly what theatrical designers do best.
Teams throughout the entertainment field are in need of storytellers who are skilled at interpreting character, creating environment and crafting mood as well as working with teams of programmers and engineers to build those experiences. This is nothing new to a theatrical designer, who regularly works with other production staff bringing stories and ideas to tangible fruition. In particular, my training at Fredonia in The Dramatic Imagination class (based on the book of the same name by Robert Edmond Jones) has readied me with a set of tools that make me very valuable on project teams. Engineers and programmers aren’t accustomed to dissecting scripts nor do they usually receive training in color theory or how various materials used in scenery can be utilized to evoke intended moods and atmospheres for guests.
What’s really interesting (and was a real ‘a-ha’ moment for me at Carnegie Mellon) is that the principles and ideas behind theatrical design are just as applicable to virtual environments as they are to real ones. Several of my friends and colleagues now at big game companies like Electronic Arts are ‘level designers’ for various game titles and talk to me about how things like ‘mass’, ‘form’ and ‘space’ are integral for both a fun shoot-em-up level and creating the proper ‘feel’ for a game. Texture artists and modelers in video games are essentially the scenic designers of their genre, many of whom come from fine art programs in illustration or graphic design. Similarly, video game companies even have staff lighting designers, who blend computer engineering with lighting design principles while never touching a real lighting instrument.
This was initially a large element of frustration for me, realizing that a significant portion of my work in this field was virtual and that compared to theatre, there was very little to ‘build’ or put my hands on. I soon realized the end result of a theatrical show and the end result of an entertainment technology experience (if done well) are essentially the same – telling a story to an audience using the tools at your disposal. In theatre, it’s the audience/guest relationship in the magical theatre box with actors, scenery and lighting. In entertainment technology-type experiences, it’s the experience/guest relationship with similar components – sometimes virtual, sometimes tangible, and sometimes a mix of the two. Theme parks and museums are fantastic examples of this, often using elaborate ‘pre-shows’ to immerse a guest in a storyline prior to a ride or main feature.
Theme parks and museums are just a fraction of spaces in which theatrical designers would excel in the digital entertainment space. Listed by Carnegie Mellon as other ‘branches of entertainment technology’, here are just a few other fields in which skills of theatrical designers would make an easy one-to-one transition:
- avatar creation and utilization
- massively multi-player online games
- themed retail, specialty restaurants, and other location-based entertainment venues
- motion-base rides
- console and PC interactive game design
- the creation of unique input devices
- virtual reality utilizing head-mounted displays or other technologies such as CAVES
- massive immersive display environments such as planetaria and Omnimax
- interactive robot animatronics
- synthetic interview technology
- augmented reality
- telepresence for entertainment and education purposes
- digital production and post-production
- sound synthesis, surround sound, 3-D sound, and streaming audio
- entertainment robotics
Technology’s permeation of society has been witnessed in theatrical design and production for years. Computerized lighting boards, servo-driven lighting instruments and multimedia performances are now commonplace. Todd’s blog is a fantastic example of how social media tech can be used as a tool to enhance new techniques and practices in theatre that normally would take years to circulate by word-of-mouth.
What’s really exciting is that it’s now happening the other way ‘round. Technology-driven experiences are now requiring skilled, educated theatrical designers to help assist in the creation of more ‘valid’, rich experiences. The master’s program at Carnegie Mellon requires students to take improvisational acting and attendance to theatrical and musical performances are compulsory. In another part of the program, students are taught (and for thespians, retaught) Aristotle’s Poetics, learning how technology experiences shouldn’t rely solely on spectacle, but instead should take into account plot, character, diction, melody and thought, just as great plays do.
In Janet Murray’s seminal work Hamlet on the Holodeck: The Future of Narrative in Cyberspace (a fantastic read for any storyteller in the 21st Century), she asserts that the computer and cyberspace are simply tools which offer expanded opportunities for storytelling. As video games, virtual reality and other experiences in the digital entertainment space continue to evolve and grow, these industries will continue to look toward theatrical designers for the ideas and techniques we know have worked telling stories in the theatre for generations. •
 Josh Jeffery is a 2007 graduate of SUNY Fredonia’s Department of Theatre and Dance, and is currently the Manager of Web and Digital Media for the Andy Warhol Museum and founder of Evil Genius Designs, Inc., in Pittsburgh, PA.
Comments : Leave a Comment »
Categories : Design
